2 Anonymous samba sharing
First I will explain the methodology to install the samba with the anonymous sharing. To install samba run,
yum install samba samba-client samba-common
It will install samba with Version 4.1.1.
Now to configure samba edit the file /etc/samba/smb.conf before making changes I will make the backup of original file as /etc/samba/smb.conf.bak
mv /etc/samba/smb.conf /etc/samba/smb.conf.bak
Further give the entries like this
vi /etc/samba/smb.conf
[global]
workgroup = WORKGROUP
server string = Samba Server %v
netbios name = centos
security = user
map to guest = bad user
dns proxy = no
#============================ Share Definitions ==============================
[Anonymous]
path = /samba/anonymous
browsable =yes
writable = yes
guest ok = yes
read only = no
mkdir -p /samba/anonymous
systemctl enable smb.service
systemctl enable nmb.service
systemctl restart smb.service
systemctl restart nmb.service
Further CentOS 7.0 Firewall-cmd will block the samba access, to get rid of that we will run:
firewall-cmd --permanent --zone=public --add-service=samba
[root@server1 ~]# firewall-cmd --permanent --zone=public --add-service=samba
success
[root@server1 ~]#
firewall-cmd --reload
[root@server1 ~]# firewall-cmd --reload
success
[root@server1 ~]#
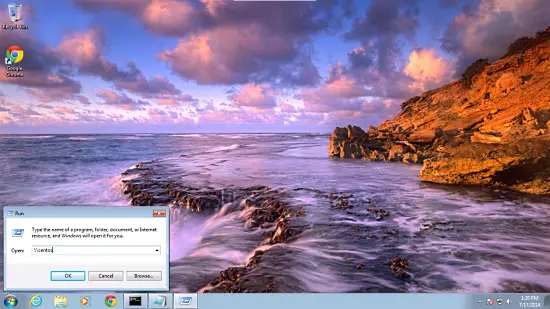
Now you can access the Centos 7.0 sharing in windows as follows, go to the Run prompt and type centos :
centos
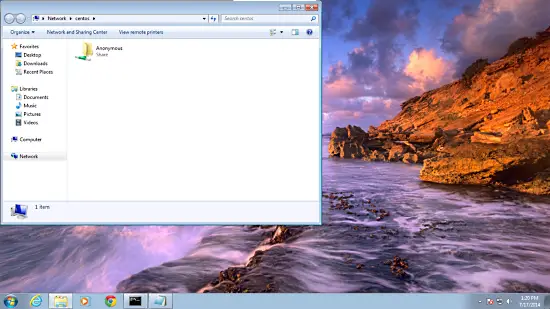
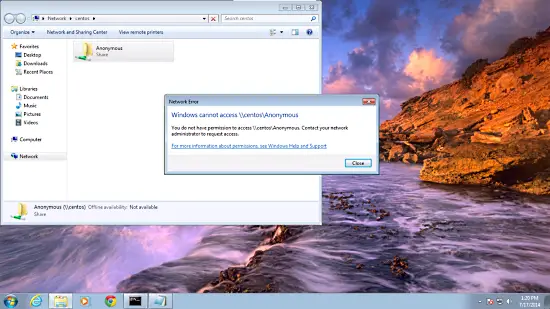
From windows machine just browse the folder and try to create a text file, but you will get an error of permission denied.
Check the permission for the shared folder.
ls -l
drwxr-xr-x. 2 root root 6 Jul 17 13:41 anonymous
[root@server1 samba]#
To allow anonymous user give the permissions as follows:
cd /samba
chmod -R 0755 anonymous/
chown -R nobody:nobody anonymous/
ls -l anonymous/
total 0
drwxr-xr-x. 2 nobody nobody 6 Jul 17 13:41 anonymous
[root@server1 samba]#
Further we need to allow the selinux for the samba configuration as follows:
chcon -t samba_share_t anonymous/
Now anonymous user can browse & create the folder contents.

You can cross check the content at server also.
ls -l anonymous/
total 0
-rwxr--r--. 1 nobody nobody 0 Jul 17 16:05 anonymous.txt
[root@server1 samba]#
3. Secured samba server
For this I will create a group smbgrp & user srijan to access the samba server with proper authentication
groupadd smbgrp
useradd srijan -G smbgrp
smbpasswd -a srijan
[root@server1 samba]# smbpasswd -a srijan
New SMB password:<--yoursambapassword
Retype new SMB password:<--yoursambapassword
Added user srijan.
[root@server1 samba]#
Now create the folder viz secured in the /samba folder & give permissions like this
mkdir -p /samba/secured
Again we will have to allow to listen through Selinux:
cd /samba
chmod -R 0777 secured/
chcon -t samba_share_t secured/
Again edit the configuration file as :
vi /etc/samba/smb.conf
[...]
[secured]
 path = /samba/secured
 valid users = @smbgrp
 guest ok = no
 writable = yes
 browsable = yes
systemctl restart smb.service
systemctl restart nmb.service
Further check the settings as follows
testparm
[root@server1 samba]# testparm
Load smb config files from /etc/samba/smb.conf
rlimit_max: increasing rlimit_max (1024) to minimum Windows limit (16384)
Processing section "[Anonymous]"
Processing section "[secured]"
Loaded services file OK.
Server role: ROLE_STANDALONE
Press enter to see a dump of your service definitions <--ENTER

[global]
	netbios name = CENTOS
	server string = Samba Server %v
	map to guest = Bad User
	dns proxy = No
	idmap config * : backend = tdb

[Anonymous]
	path = /samba/anonymous
	read only = No
	guest ok = Yes

[secured]
	path = /samba/secured
	valid users = @smbgrp
	read only = No
[root@server1 samba]#
Now at windows machine check the folder now with the proper credentials
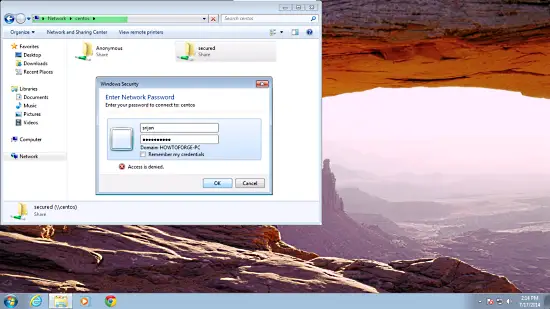
You will again face the issue of permissions to give write permission to the user srijan do:
cd /samba
chown -R srijan:smbgrp secured/
Now samba user have permissions to write in the folder. Cheers you have done with samba server in CentOS 7.0 :)
삼바 (Samba, SMB) 란?
Samba는 흔한 IT 용어처럼 줄임말이 아니라는 점이 특이하다.
SMB라는 서버 메시지 블록에서 유래한 말이다.1
이 SMB는 윈도우 네트워크 파일 시스템에 의해 사용되는 표준 프로토콜이다.
오스트리아의 Andrew Tridgell이 최초로 개발하였다고.
어디에 쓰이느냐 요약하자면
1. 리눅스와 이종 OS (윈도우, 맥, 유닉스 등) 간의 자원 공유
2. 프린터 등의 장치 공유
프린터 공유는 별로 쓰이지않는 것 같다.
윈도우 서버 도메인과 함께 동작할 수 있고, 주 도메인 컨트롤러 (PDC) 또는 도메인 멤버로서도 동작할 수 있다.
거의 모든 리눅스 배포판의 표준이며 다른 유닉스 기반의 OS에서도 기본 시스템 서비스로 대부분 포함되어 있다는 것이 특징.
기본적으로 포함되어 있을 경우 설치할 것 없이 설정하고 시작만 하면 된다.
OS에 포함되어 있거나 yum(redhat 계열), apt-get (ubuntu) 로 설치할 경우
설정 파일의 경로는 /etc/samba/smb.conf 이다.
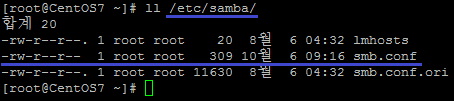
*설치환경
- CentOS 7.x, 3.10.0-123.8.1.el7. x86_64
- PuTTY
*환경설정 예
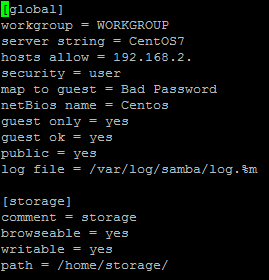
[global] : 전역설정, 전체 항목에 적용되는 설정값
workgroup = <그룹명> ; 공유하고자하는 OS의 작업그룹명과 일치해야한다.
server string = <내용> ; 해당 리눅스 서버에 대한 설명
hosts allow = <...> ; 연결을 허용하고자 하는 대상
security = <user(default) , share(not working)>
* user : smbpasswd 명령어로 사용자를 생성할 수 있다. 해당 유저들만 접속을 허용하는 형태
* share : 인증없이 공유하는 형태.
** share 옵션의 경우 문제가 발생한다. 이제 옵션이 무의미해진 것 같다.

이와 같은 오류가 발생하는데 이 상태로서는 해결 방법이 없다.
security 옵션 값을 user로 변경하고
map to guest = Bad Password 를 추가해주면 인증없이 연결이 가능하다.
netBios name = 타 OS 네트워크 환경에서 보여지는 이름
guest only = <> ; 익명접속만 허용할 것 인지 여부
guest ok = <> ; 익명접속을 허용할 것인지 여부
public = <> ; 공동사용 디렉토리 허용 여부
log file = <path> ; 로그를 생성할 경로 설정
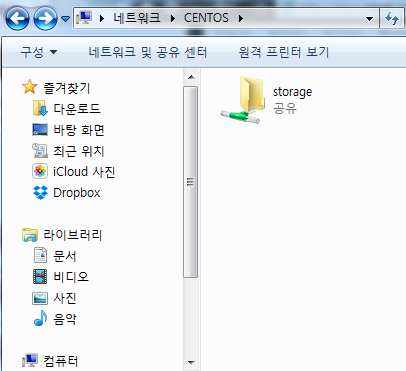
두번째 문단의 [이름] 항목들은 공유하고자 하는 대상이다.
보여주고자하는 이름으로 적당히 작성하면 된다.
[storage]
comment = <텍스트> ; 설명
path = <경로> ; 공유하고자 하는 경로
browseable = < > ; 탐색 가능 여부
writable = < > ; 쓰기 여부
이와 같이 설정 파일을 작성하고 친절하게 검사 받을 수 있는 기능도 있다.
testparm 명령어가 바로 그것.
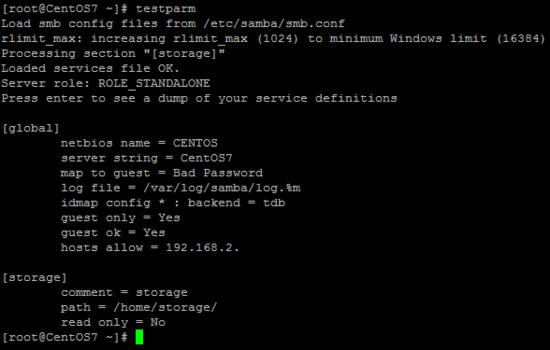
엔터를 치고난 후 나타는 설정 내용들이 구동 시에 실제 적용될 내용들이라 보면 된다.
문제가 있을 경우 그 부분을 수정하면 된다.
중간에 idmap config * : backend = tdb 라는 항목이 생겨난 것을 알 수 있는데,
저 부분은 Samba에 기본으로 설정된 항목이다. backend = tdp 는 사용자 디비 저장 방식에 대한 설정
[storage] 항목에 browseable과 writable이 read only = no 항목 하나로 변경된 것을 알 수 있다.
이 부분까지 마쳤으면 설정은 끝난 것인데 서비스를 실행하기 전에 몇가지 할일이 있다.
일단 계정부터 만들어야겠다.
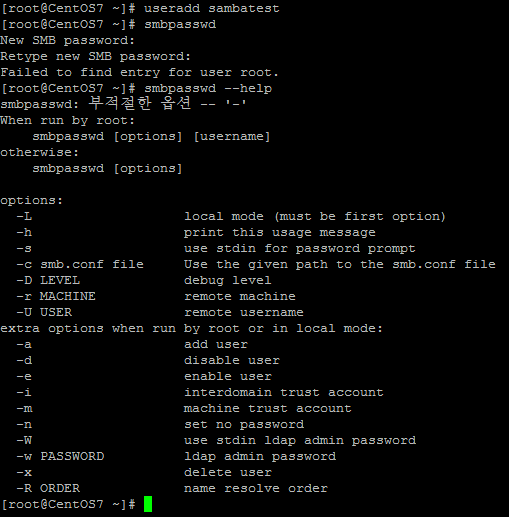
리눅스 계정명은 sambatest로 생성했다.
smbpasswd 명령어로 samba 계정을 추가/삭제/수정할 수 있다. 옵션들.
계정을 만드는건 smbpasswd -a <계정명>으로 하면 된다.
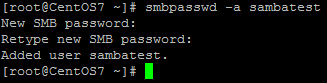
동일한 이름으로 계정 생성.
순전히 인증없이 공유를 하려면 계정 생성과정은 생략해도 된다.
다음으로 자신이 리눅스에 자신이 없다면 SELinux를 끄도록 하자. 보안향상에는 도움이 되지만 잘 알지 못한다면 툴들을 이용하는데 애먹을 수 있다.
/etc/selinux/config 파일을 열어 disable 해주자.
iptables 를 이용한다면 /etc/sysconfig/iptables 파일을 열어서
135, 137, 138 (이상 udp), 139, 445 (이상 tcp) 포트를 허용해주자
xwindow를 사용 중이라면 프로그램의 방화벽에 들어가서 samba 서비스를 허용해주면 된다.
CentOS 7 기준에서 방화벽 설정시 주의할 점은 일시적 (현재 러닝) 설정과 영구적 설정이 있는데 둘다 해주어야 지금도 되고, 재부팅 후에도 계속 적용된다는 점 유의하도록..
이제 삼바 서비스를 시작하도록 하자.

smb는 삼바 서비스, nmb는 IP 주소를 사용할 수 있도록 이름을 지정하는 서비스다.
nmb는 구지 실행해줄 필요는 없지만, 꺼져있다면 윈도우 상의 네트워크에 표시되지 않는다.
접속에는 문제 없다.
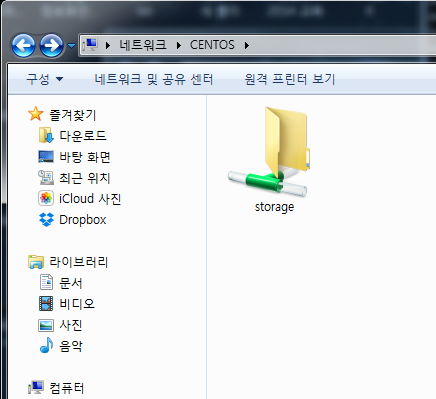
이제 접속을 해보자.
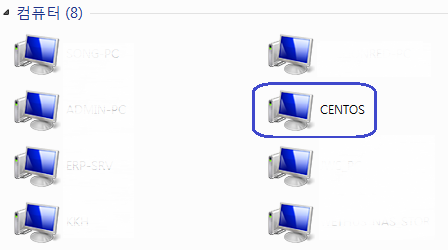
클라이언트 피씨는 Windows 7 pro 64x 사용 중이다.
네트워크에 CENTOS가 표시되는걸 확인할 수 있다.
잘 작동하고 있다.
이번엔 익명접속을 해제하고 인증을 받도록 설정해보겠다.
설정파일 수정후엔 꼭 서비스를 재시작 해줘야 한다는 점 잊지 말아야겠다.
systemctl restart smb (또는 smb.service)
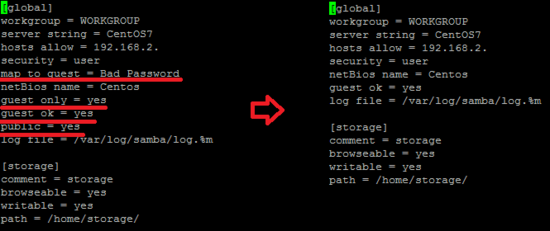
map to guest, guest only, guest ok, public (삭제할 필요는 없음) 을 삭제하고 서비스를 재실행
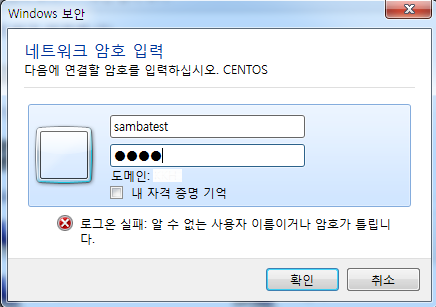
이와 같이 익숙한 인증창이 뜬다.
사전에 smbpasswd 로 만들어놓은 sambatest 계정으로 로그인시도.
접속이 잘 된다. 파일 생성 삭제까지 잘 되는지 확인해보자.
추가로 필요한 설정들은 인터넷 검색으로 쉽게 찾아볼 수 있다.
--------------------------------------------------------------
추가 테스트.
업로드와 다운로드 속도는 얼마나 나올 것인가?
다른 툴을 이용하지 않고 윈도우에서 테스트할꺼임.
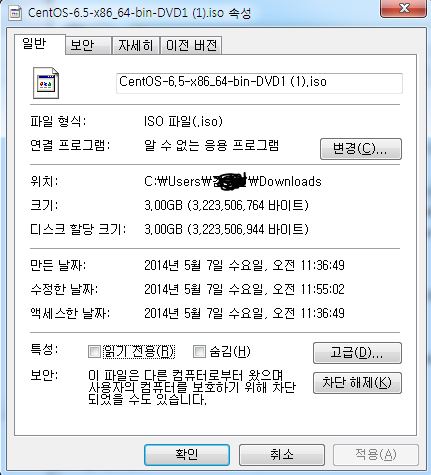
테스트에 참가할 선수는 사전에 받아놓은 CentOS 6.5 이미지 파일.
업로드부터.
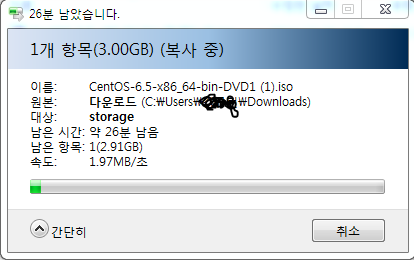
망할 인터넷을 바꿔야하나.
다운로드는 어떨까?

/boot 폴더에서 그나마 용량이 큰 파일 하나를 빼왔다. 이 놈으로 확인해볼 것.
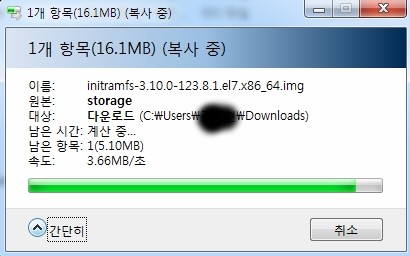
그저 그렇다.
네트워크를 통해 쓰는거니 그러려니 한다해도..
인터넷을 바꾸던가 해야지 이거 원..